Everything You Need to Know Before Getting Microneedling
Curious but scared about microneedling? Here’s my full first-timer’s guide, based on my own experience, with everything from how to choose the right type, how to prep, what to expect on the day, and when you’ll see results.

I'm going to be honest, I’ve always been a little bit terrified of in-clinic procedures. Despite how seemingly commonplace they’ve become (thanks to social media), the idea of sticking needles in my face was...a tad unpleasant, to say the least.
But at 37, I’ve started noticing some early signs of aging that skincare alone can't entirely fix. So, after years of hesitation, I finally decided to dip my toes into the world of cosmetic treatments with my first microneedling appointment.
Because I was so nervous, I spent weeks doing my research and taking my time to make the right choices. Now I’m sharing my own experience here for anyone else feeling the same way.
What Is Microneedling?
Microneedling involves using a device with tiny, sterile needles to create micro-injuries in the skin. These micro-injuries trigger your body’s natural healing response, boosting collagen and elastin production (you know, just literally the foundation of plump, firm, youthful skin). Some of its most common benefits include:
Improved texture and firmness
Reduction in acne scars and pigmentation
Minimized appearance of pores
Smoother fine lines and wrinkles
Enhanced absorption of skincare products
Now, if causing intentional injury to your face sounds scary to you (I know it did to me), then let me put you at ease. The needles are extremely fine, and the depth can be adjusted depending on your skin type, tone, and concern.
Who Is It For?
Microneedling works for most skin types, but it can be especially useful for:
Those dealing with acne scars or post-acne marks
People noticing loss of firmness or early aging signs
Anyone with rough, uneven skin texture
Those who want to boost glow without injectables
However, it’s not for everyone. If you have active acne, eczema, rosacea, or any open wounds, you’ll need to wait until your skin barrier is healed.
And for my fellow brown-skinned friends: always work with a practitioner experienced in treating melanin-rich skin, as we’re more prone to post-inflammatory hyperpigmentation (PIH) if the treatment is too aggressive. Personally, I was worried about any potential PIH arising from the procedure, so I spoke to my practitioner and made sure she knew I didn't want the needles to go too deep.
Different Types of Microneedling, and Which is Right For You

Not all microneedling is created equal, and which one you choose depends entirely on your own skin goals.
1. Basic Microneedling
This is your classic version, just the needling itself to stimulate collagen. Great for first-timers or those with mild concerns.
2. Microneedling with Actives
Some clinics pair microneedling with serums like vitamin C, tranexamic acid, or brightening cocktails to enhance results. These are applied while your skin channels are open, improving penetration.
3. Microneedling with PRP/PRF (“Vampire Facial”)
Here, platelet-rich plasma or platelet-rich fibrin (both drawn from your own blood) are applied during the treatment. PRF is a newer version that releases growth factors more slowly, offering longer-lasting rejuvenation, while PRP provides a quick boost. Both are rich in growth factors that support healing and collagen production.
4. Microneedling with Exosomes
A newer variation where exosomes are applied to help repair and rejuvenate. Think of it as the high-tech cousin of PRP. Just remember, this is usually more costly than PRP/PRF and its benefits aren't proven.
5. RF (Radiofrequency) Microneedling
The most controversial and polarising version, RF microneedling uses heat energy along with needles to target deeper layers for tightening and lifting. It’s more intense, painful, and with slightly more downtime. You'll see a lot of people raving about its more dramatic results, but an equal number warning you about potential side effects like facial fat loss or PIH.
What I chose and Why
As someone with anti-aging as their primary skin goal, I decided to go for microneedling with PRP. I spent ages researching the different options, weighing the pros and cons, and reading every real-user review I could find. In the end, PRP felt like the perfect balance between results and safety for a first-timer.
Exosomes were tempting but still too new (and expensive) for my comfort. My practitioner recommended RF microneedling, but the potential side effects felt like too big a risk at this stage. And, if you’ve followed this blog for a while, you’ll know I prefer the low-and-slow approach. So, RF microneedling can wait until I’ve seen how my skin responds to the regular version first.
Finding a Good Practitioner
Do your homework. Microneedling may sound straightforward, but the skill of the practitioner makes all the difference. Look for:
Certified dermatologists or medical aestheticians
Experience with your skin tone and concern
Clean, sterile clinic setup
Before-and-after photos of previous patients (especially with similar skin tones)
Don’t be shy about asking how they sanitize their equipment or what needle depth they plan to use. You’re not being "difficult," you’re being diligent.
Prepping Your Skin Before Microneedling
About 3 days before your appointment (5 days, if you have sensitive skin):
Pause active ingredients like retinoids, AHAs/BHAs, benzoyl peroxide and vitamin C
Keep your skin well-hydrated with gentle moisturizers
Avoid sun exposure or tanning
Don’t wax, shave aggressively, or exfoliate harshly
Don't take aspirin or other medication that could cause bleeding to be worse on the day
What to Expect on the Day

You'll usually be asked to arrive 30-40 minutes before your appointment time so your provider can apply numbing cream on your face. This is absolutely necessary, do not trust any clinic that doesn't numb your face first. If you’ve chosen PRP or PRF, they’ll also use this time to draw your blood and spin it in a centrifuge.
Then it's time for the procedure to begin. Here, obviously pain levels are subjective, and your experience may differ from mine based on the needle depth and pressure your practitioner decides to use. But, the pain was very manageable for me. I would rate it a solid 2 or 3/10. Things did get a little bit spicy around my forehead, where I have almost no facial fat to speak of (sigh), but still nothing unbearable.
To finish, my practitioner created a diy face mask out of gauze and the leftover PRP, which helped calm my skin down. The whole process took about 20 minutes, and afterward, my skin looked pink and a bit flushed, but definitely not bruised and bloody (like I've seen some people on social media look after their sessions).
Aftercare and Recovery

Obviously, your face is going to be a little sore and swollen after the procedure, so here are a few things you can do to help it recover faster
Do not wash your face on the day of your treatment, the clinic gave me a saline solution to wipe gently across my face instead
Use just a gentle cleanser, hydrating moisturizer or serum and non-irritating sunscreen for the next 2-3 days (avoid direct sun exposure if you can)
Avoid makeup, strong actives, or exfoliants for at least 3-5 days (depending on how sensitive your skin is)
A hypochlorous acid spray can calm your skin and help it heal
Skip intense workouts, saunas, or swimming for at least 2 days
You might experience some dryness, flaking, or tightness, which is totally normal, but your skin should get back to it's healthy self within about 2-5 days. For me, it took about 3 days and I looked completely fine.
When to Expect Results
Even though this is an in-clinic procedure, do not expect instant dramatic results from it.
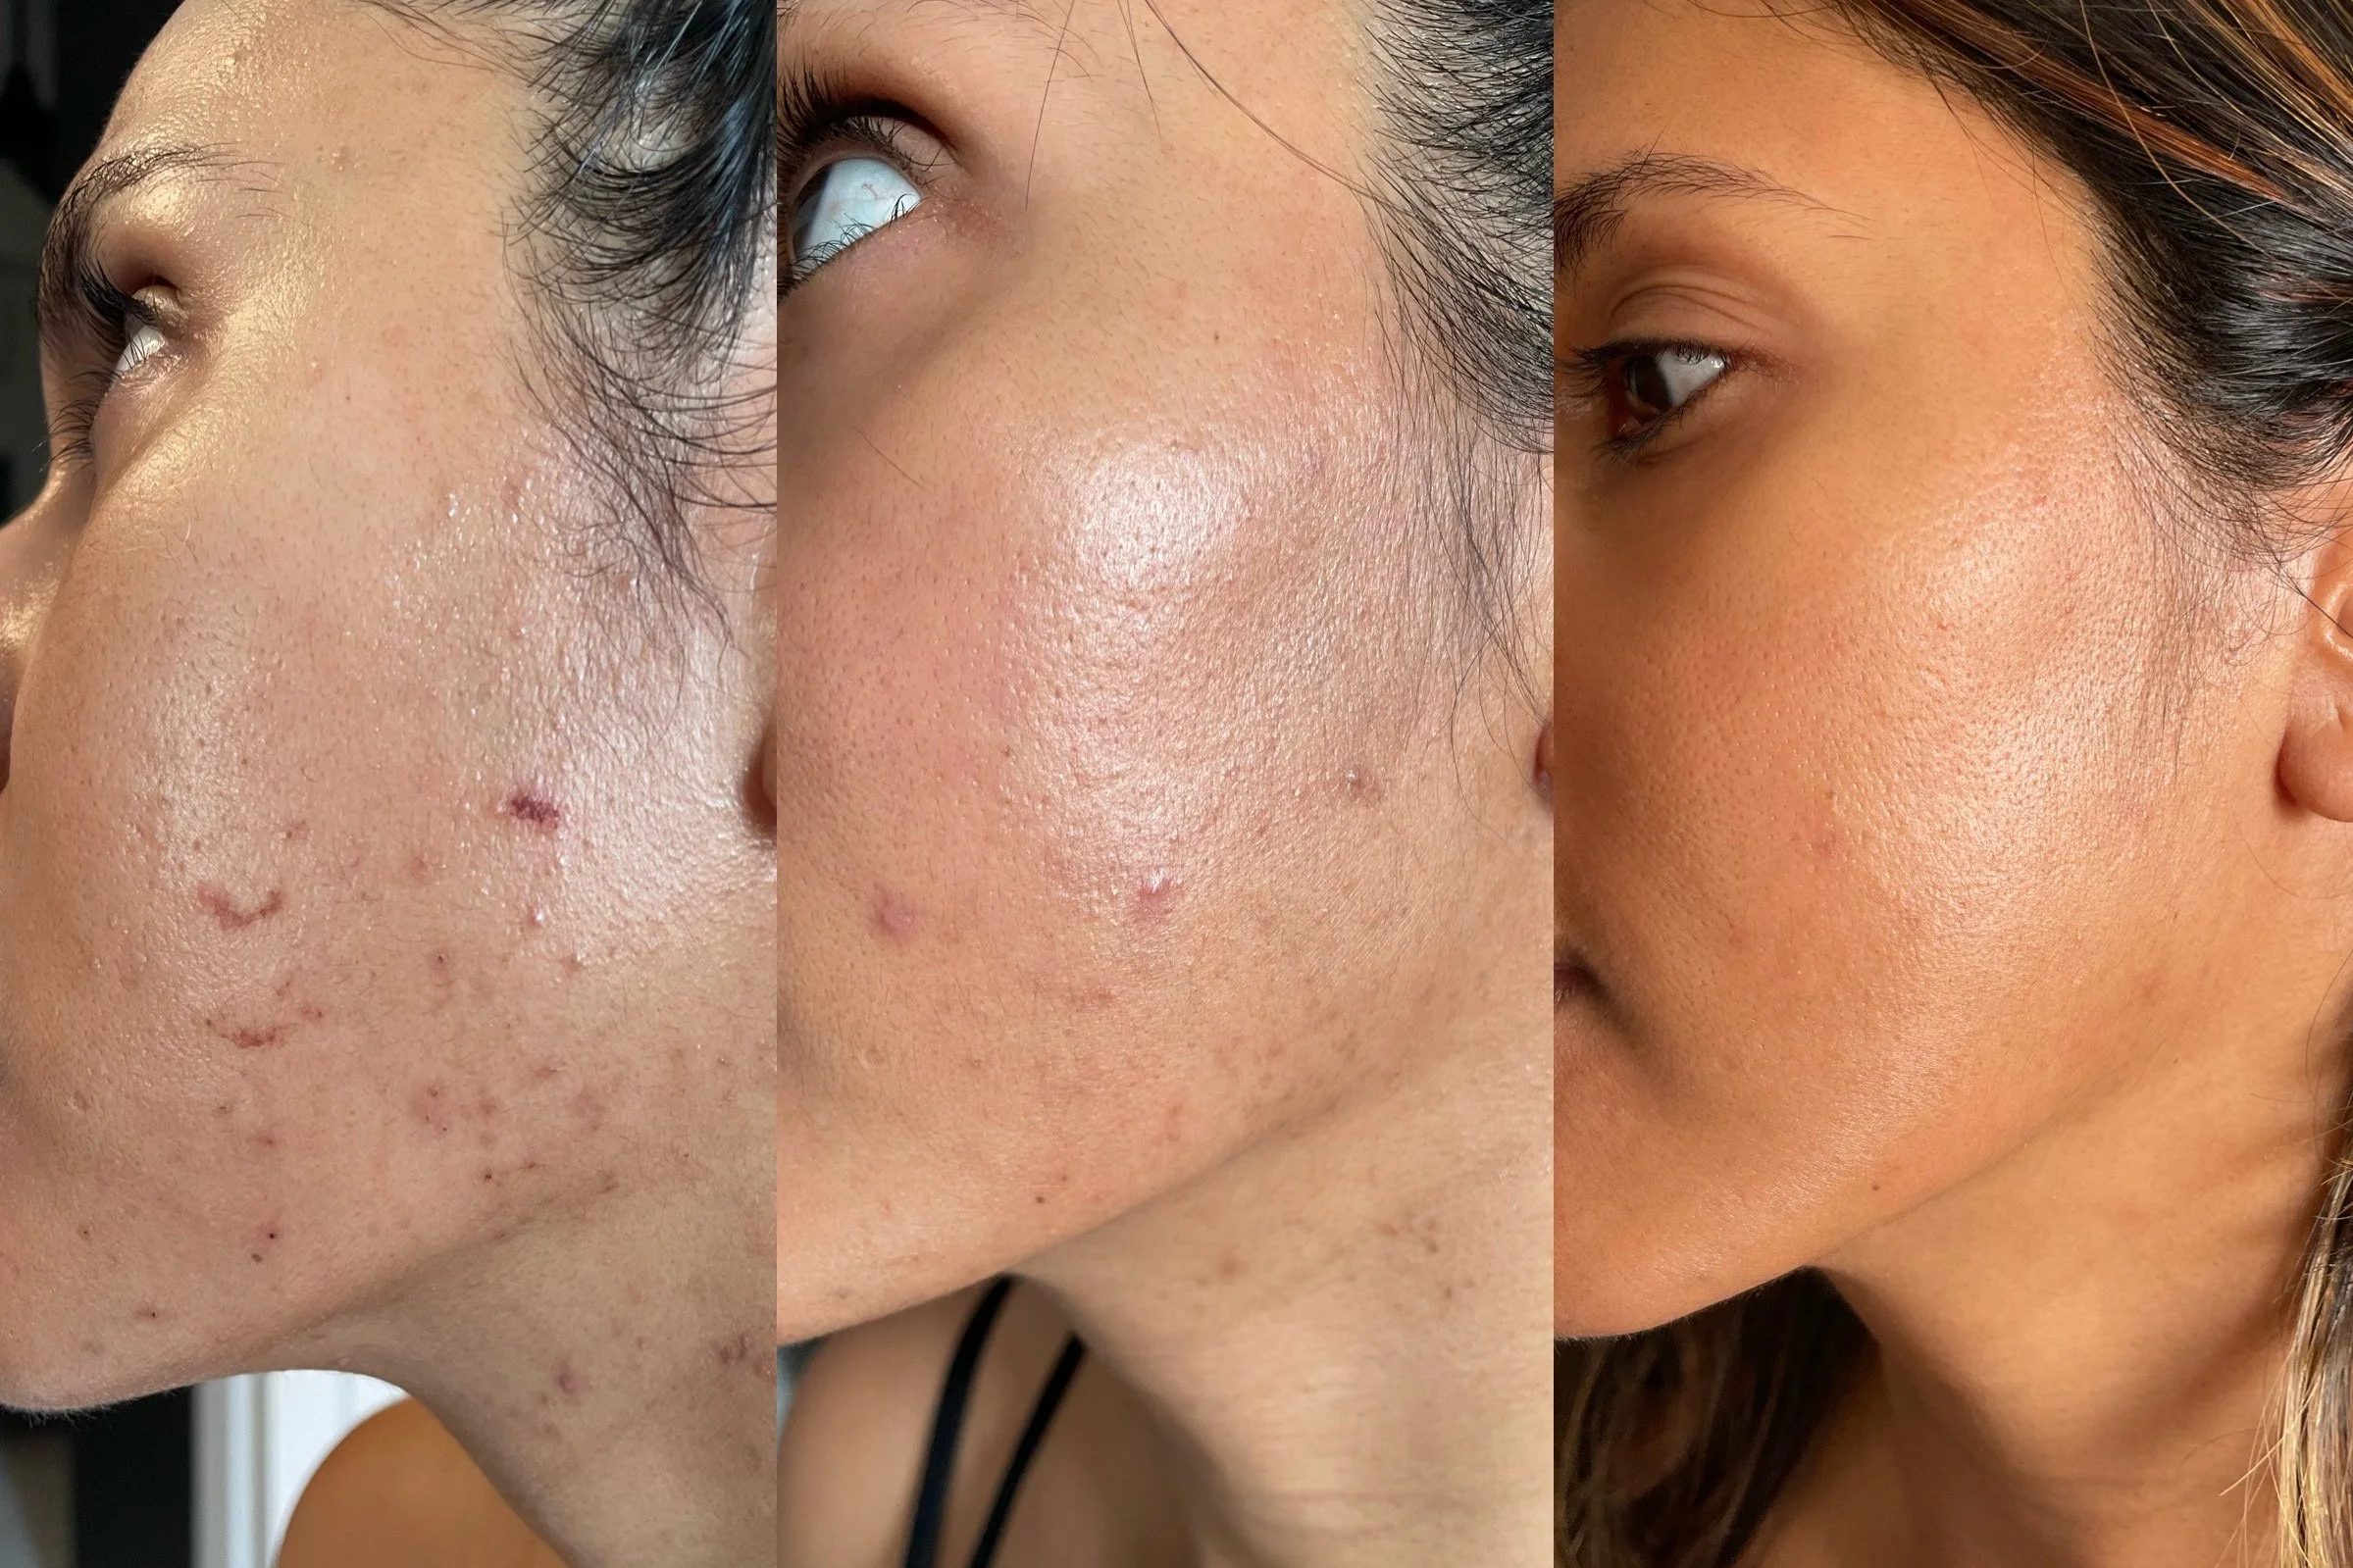
You’ll start noticing a subtle glow-up within a week, but real results show up after 4–6 weeks, once the collagen remodeling starts kicking in.
My practitioner recommended doing at least 3–6 sessions spaced 4–6 weeks apart for best results. Based on my current results, I've already booked in my next appointment, and plan to do a total of 3 sessions before really judging the impact it's had on my skin.
Final Thoughts
If you’ve been on the fence like me, microneedling might be your perfect gateway into in-clinic treatments. It’s effective but still minimally invasive. It’s not a miracle cure, but it’s one of the few procedures that genuinely helps your skin help itself.
Let me know down in the comments if you’ve already tried microneedling, or you plan to try it soon.

About The Skinimalist
Hi, I’m Mal, a 30-something recovering skincare addict, and this is my blog. A space where I attempt to de-influence you from chasing trends and buying more skincare products you may not need.
Related Posts:

It may be hailed as the hydration hero of skincare, but does it deserve a solo product? Here’s why I’d never buy a standalone hyaluronic acid serum, toner or essence—and what I use instead.